Hoe om Google Analytics op te stel
Google Analytics word gebruik om webverkeer te sien en te verstaan.
Dit is gratis en maklik om te gebruik.
U kan dit vir baie gebruiksgevalle aanpas.
Dit werk uit die boks.
Dit is vinnig om op te stel. Kry jou insigte vandag!
Skep my gratis webwerf ❯Slaan oor om oor Google Analytics te lees. Neem my direk na die eerste stap. Gaan na die eerste stap
Wat is Google Analytics
Google Analytics is 'n webanalise-oplossing.
Dit word deur Google ontwikkel en ondersteun.
Die nuutste weergawe word Google Analytics 4 genoem.
Dit kan gebruik word om data soos gehoor, bladsybesigtigings, sessies en, demografie en gebeure te sien.
Hoekom aktiveer Google Analytics
Verstaan jou webverkeer om beter besluite te neem.
Verstaan en verbeter die verkoopstregter.
Leer uit eksperimentering (byvoorbeeld, a/b-toetse).
Google het 'n ander oplossing genaamd Google Optimize. Hierdie oplossing is gemaak vir toetsing.
Vir wie is Google Analytics
Google Analytics is nuttig vir almal wat 'n webwerf het.
Dit gee jou inligting oor wie jou werf gebruik en hoe hulle daarmee omgaan.
Daarbenewens is die koppelvlak maklik om te verstaan.
U het nie 'n analitiese agtergrond nodig om die diens te gebruik en te navigeer nie.
Hoe om Google Analytics stap-vir-stap op te stel
Google Analytics kan op twee maniere opgestel word Die Global Website Tag (gtag.js) of Google Tag Manager .
Die maklikste manier is om The Global Website Tag te gebruik.
Hierdie tutoriaal sal die The Global Website Tag-benadering gebruik.
Voorbereidings
Besluit watter koderedigeerder om te gebruik en stel jou omgewing op.
W3Schools het 'n maklik-om-te gebruik kode-redigeerder genaamd W3Schools Spaces geskep . Registreer en begin met 'n paar kliks.
Begin gratis ❯Skep jou index.html lêer sodat jy gereed is om die kode in te voer.
Alle opstelling. Kom ons gaan!
Stel Google Analytics op: Die Global Website Tag
Stap 1: Skep 'n Google Analytics-rekening
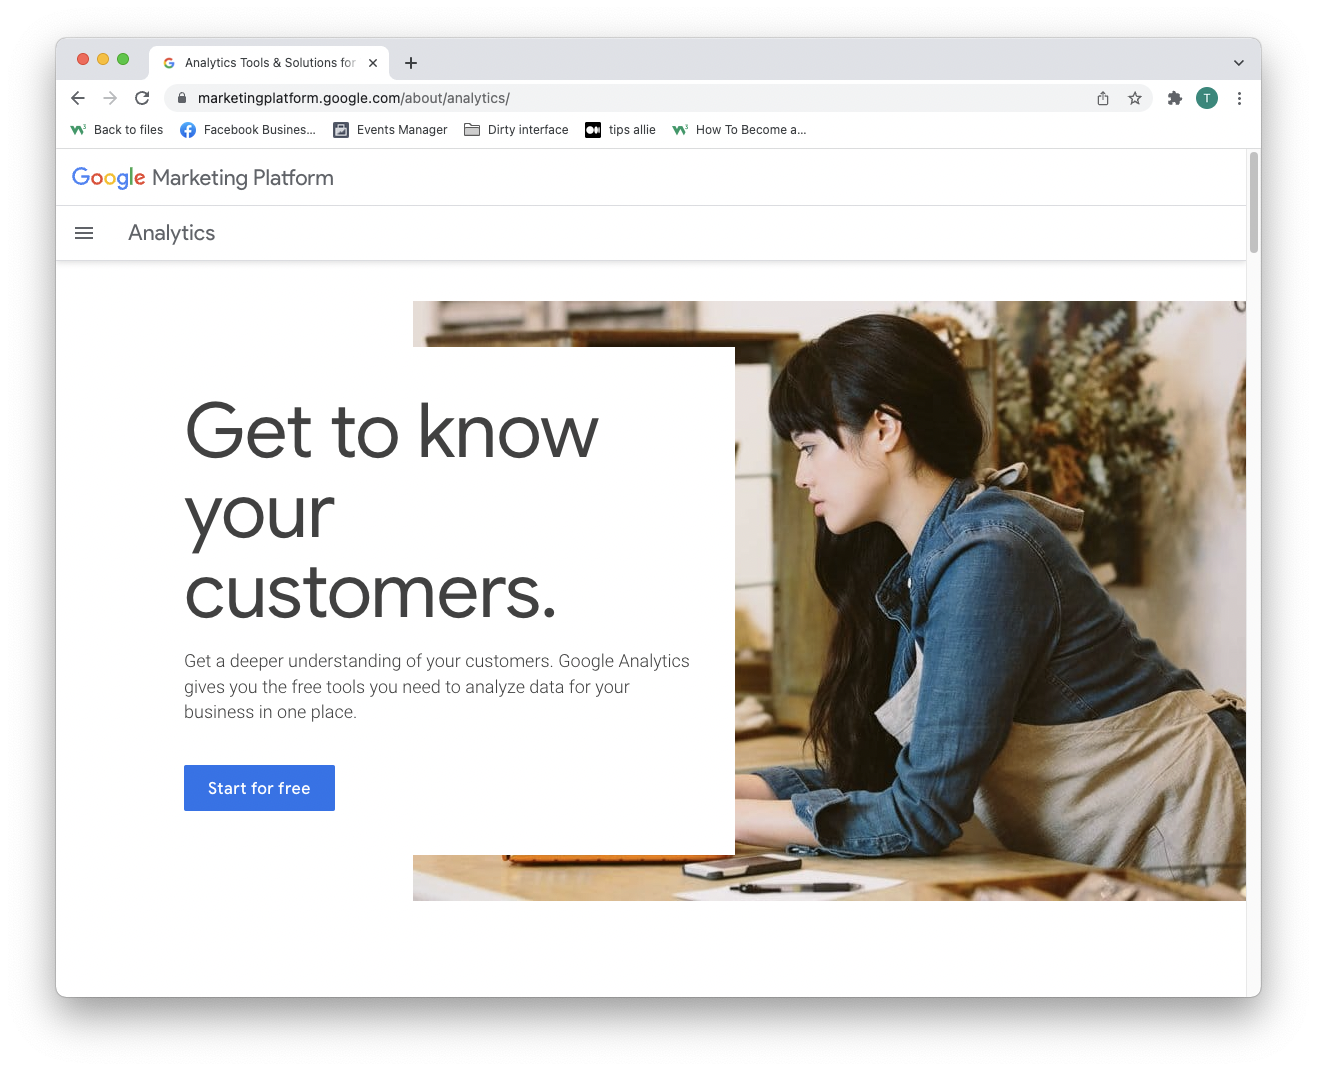
Gaan na Analytics: Skep 'n rekening of meld aan by Analytics
Die skakel in die paragraaf hierbo neem jou na die Google Analytics-bestemmingsbladsy.
Klik op die "Begin gratis"-knoppie.
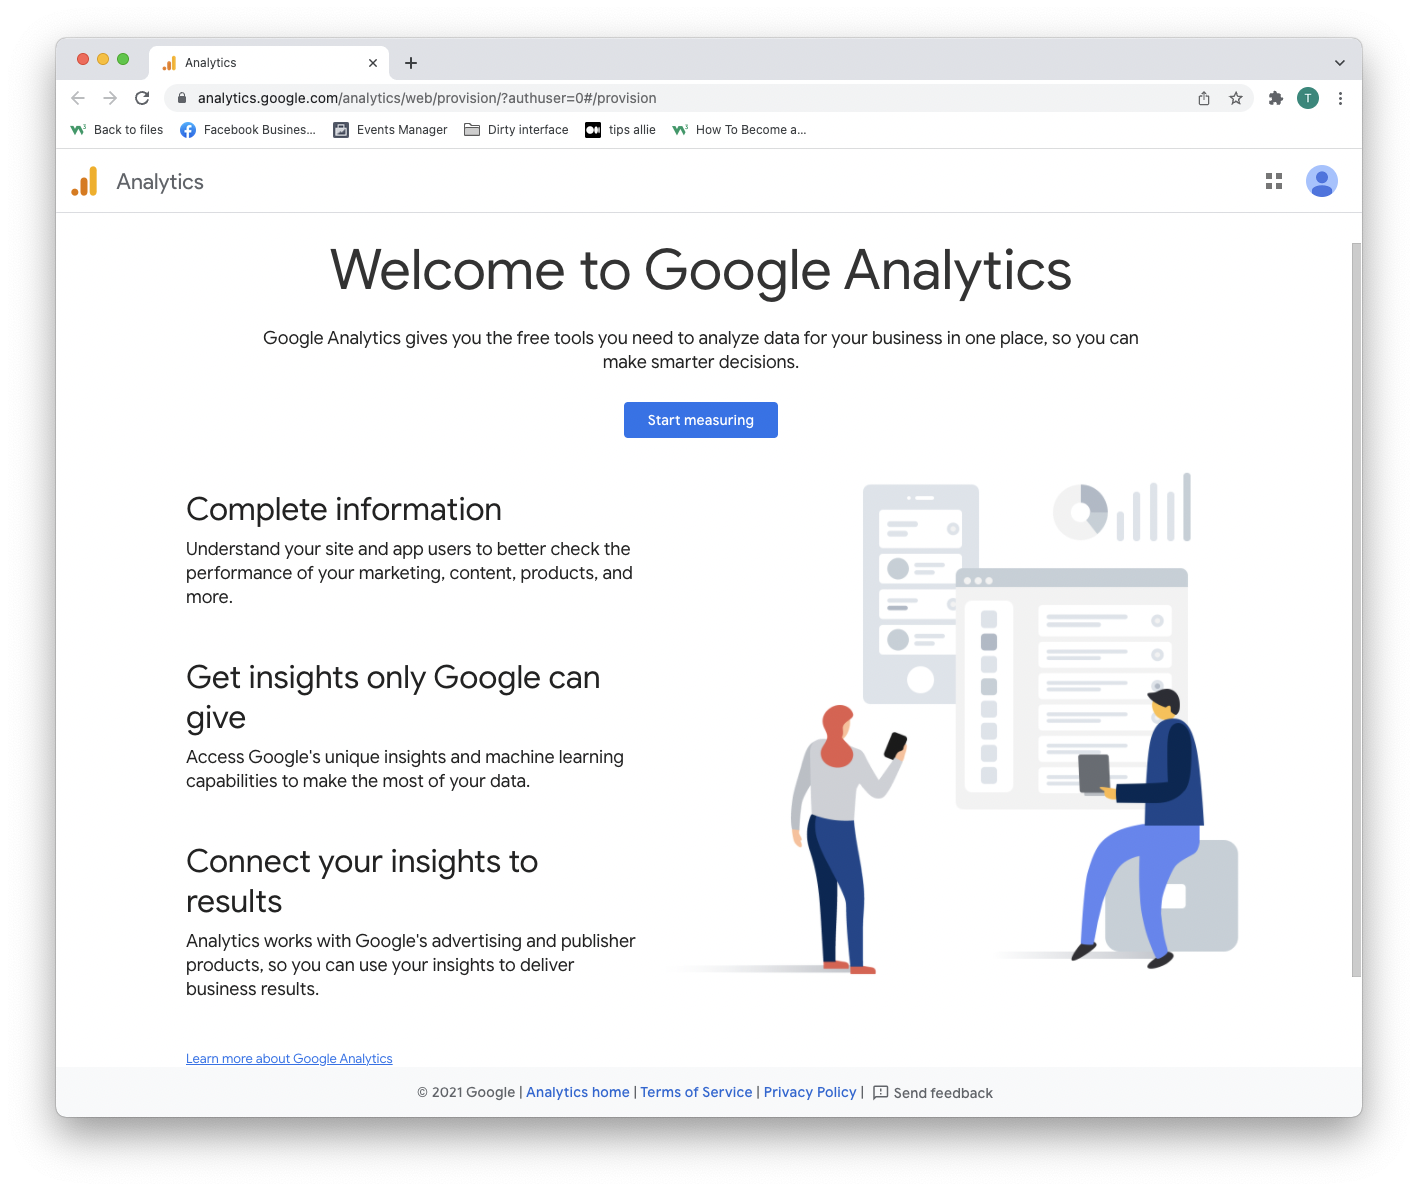
Stap 2: Gaan die welkombladsy in
Nadat u 'n rekening geskep het of aangemeld het, is u welkom by die oplossing.
Druk die "Begin meet"-knoppie om voort te gaan.
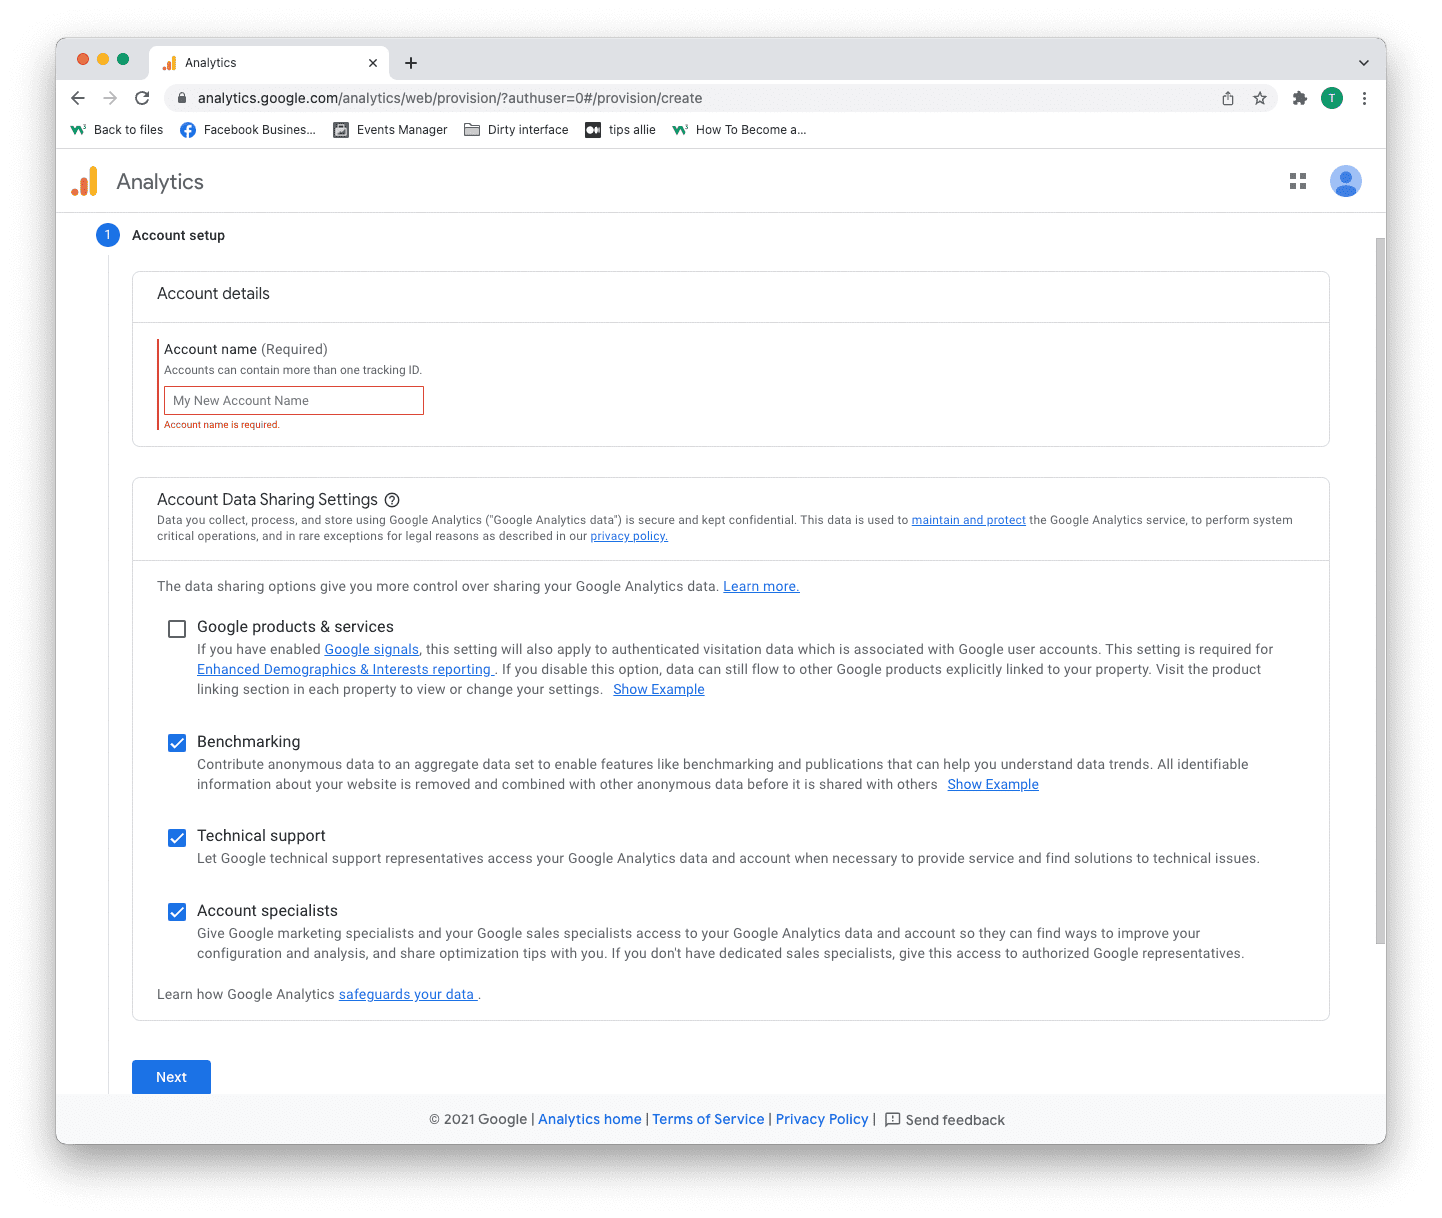
Stap 3: Rekeningopstelling
Jy het twee besluite om hier te neem.
- Voer jou rekeningnaam in.
- Besluit watter data jy wil deel.
- Klik op die "Volgende" knoppie.
Een rekening kan meer as een dop-ID hê. Jy kan meer as een webwerf met 'n rekening dop.
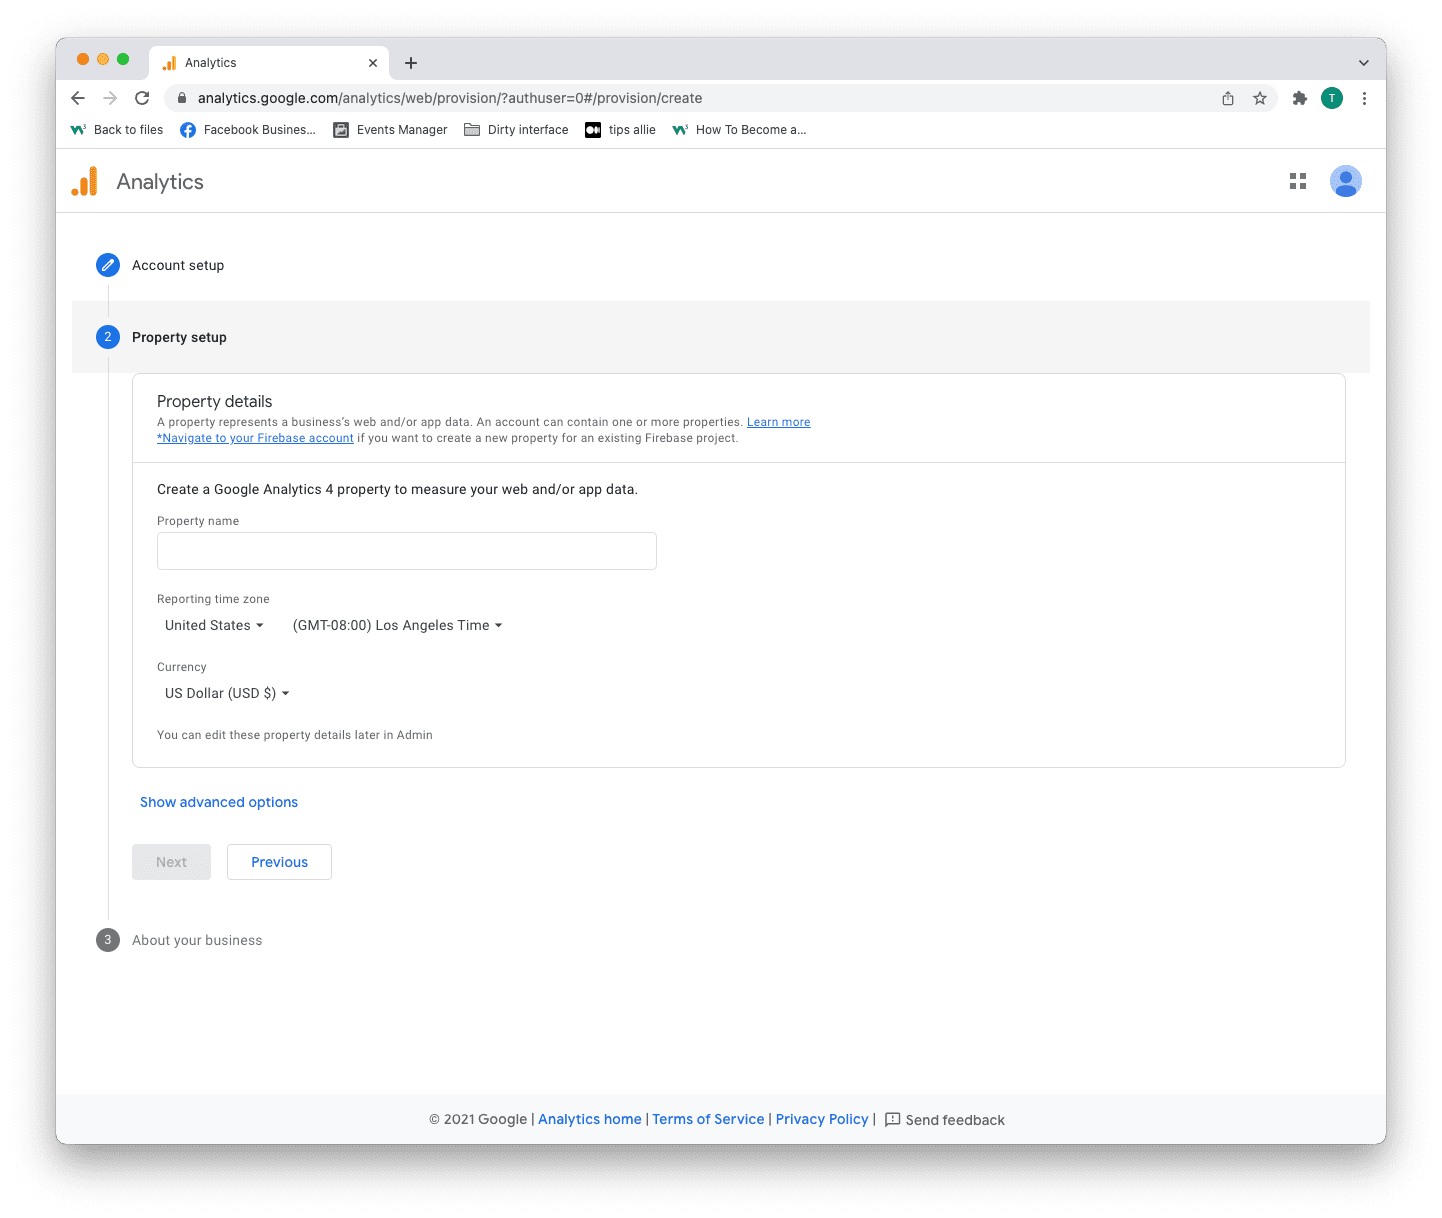
Stap 4: Eiendom opstel
Eiendom is die diens wat jy meet, soos 'n webwerf, toepassing, skakelboom, ens.
- Voer 'n eiendomnaam in.
- Voer jou tydsone in.
- Voer die geldeenheid in wat jy gebruik.
- Klik op die "Volgende" knoppie.
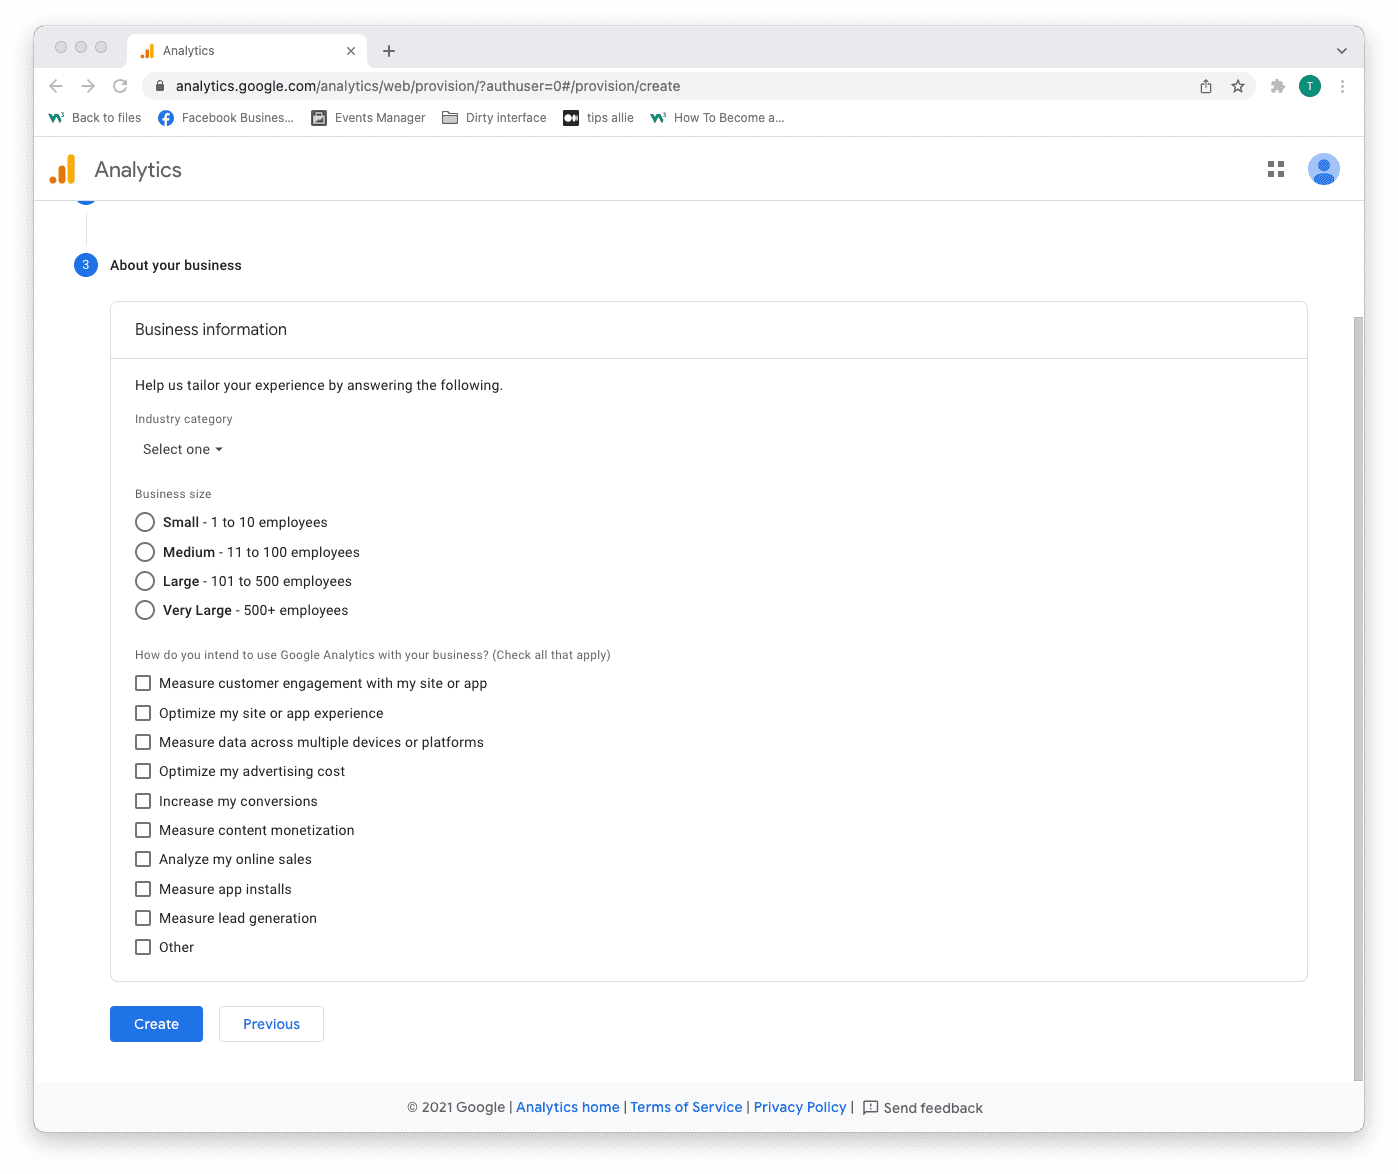
Stap 5: Voeg besigheidsinligting by
Analytics gebruik die inligting om jou ervaring aan te pas.
- Kies jou bedryfskategorie.
- Kies besigheidsgrootte.
- Tick the boxes for how you are planning to use Analytics.
- Click the "Create" button to proceed.
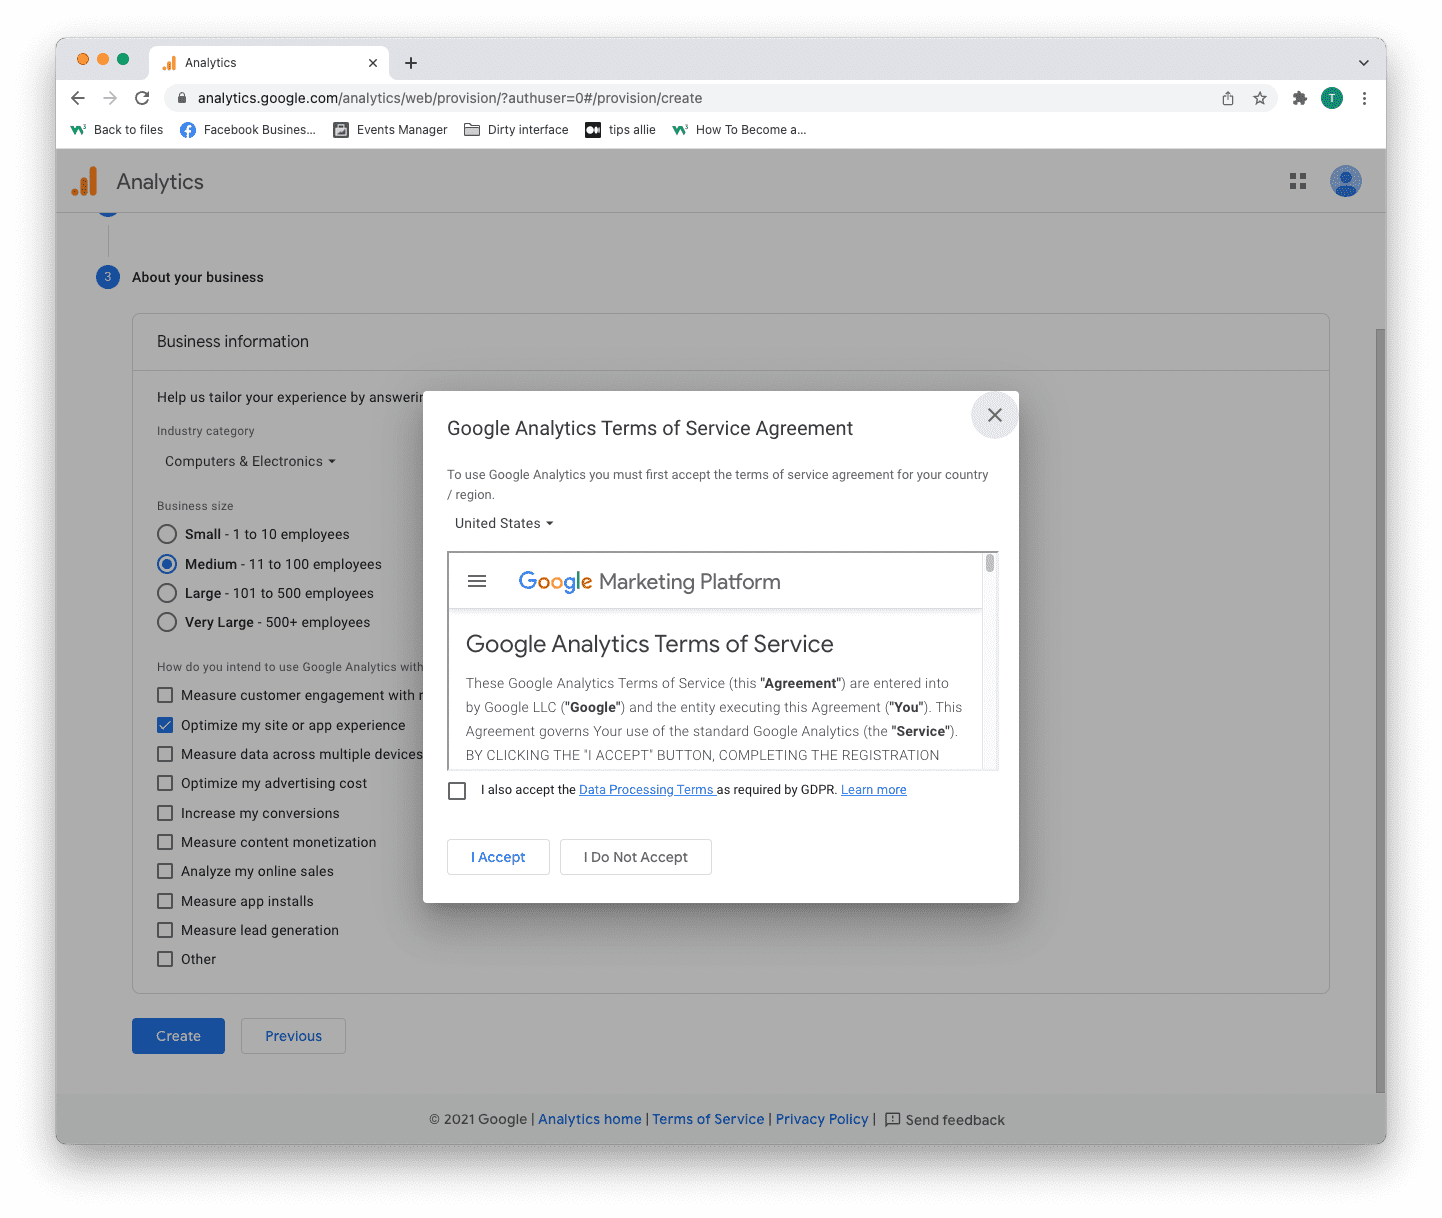
Step 6: Terms of Service Agreement
Read and understand the terms of service.
Tick the GDPR box and click the "I accept" button if you agree.
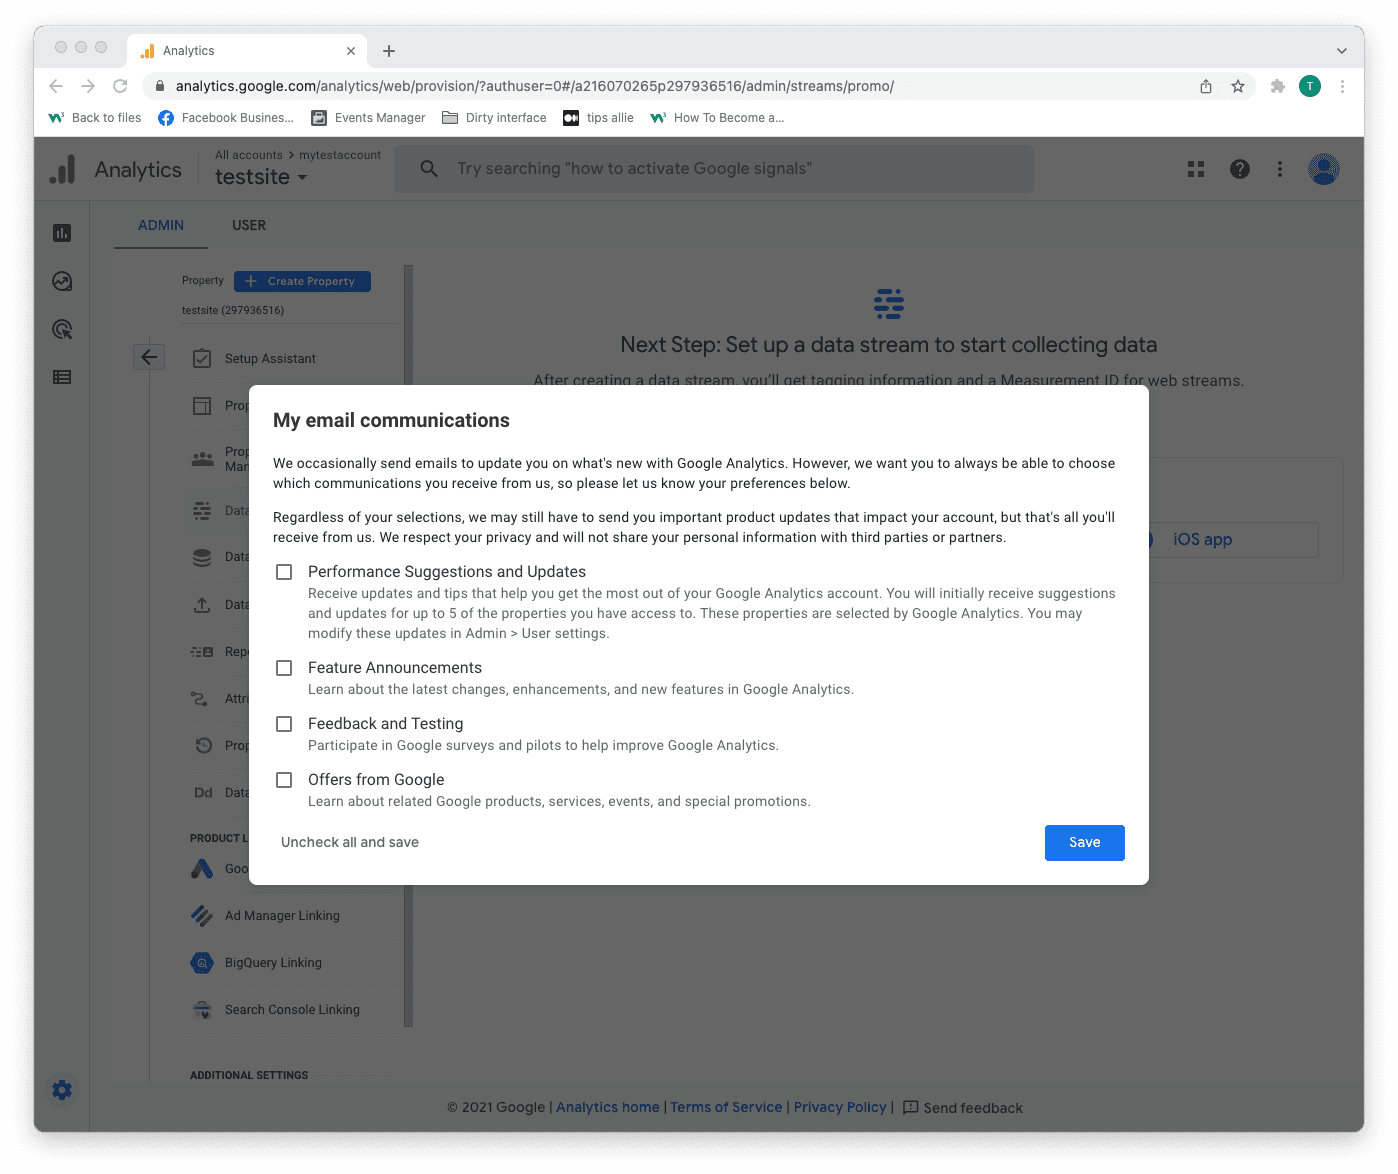
Step 7: Email subscriptions
- Tick or uncheck all boxes.
- Click the "Save" button to continue.
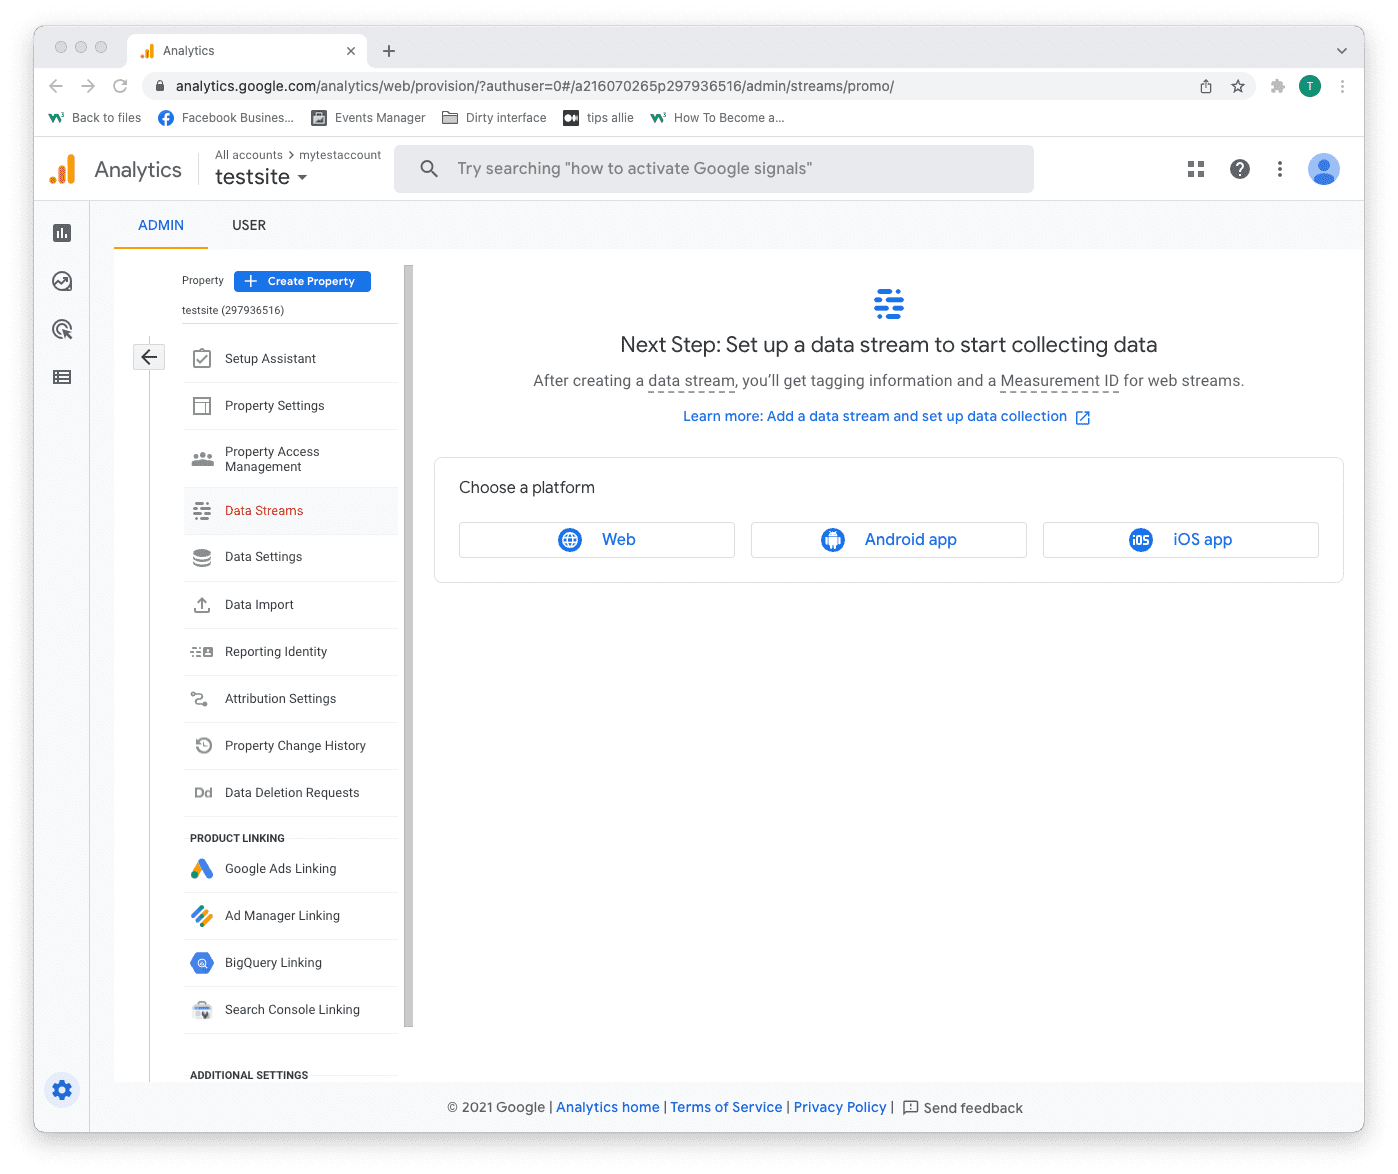
Step 8: Select platform
Chose the platform where you are collecting data.
Then, click the relevant platform to continue.
We are continuing with "Web" as the example in this tutorial.
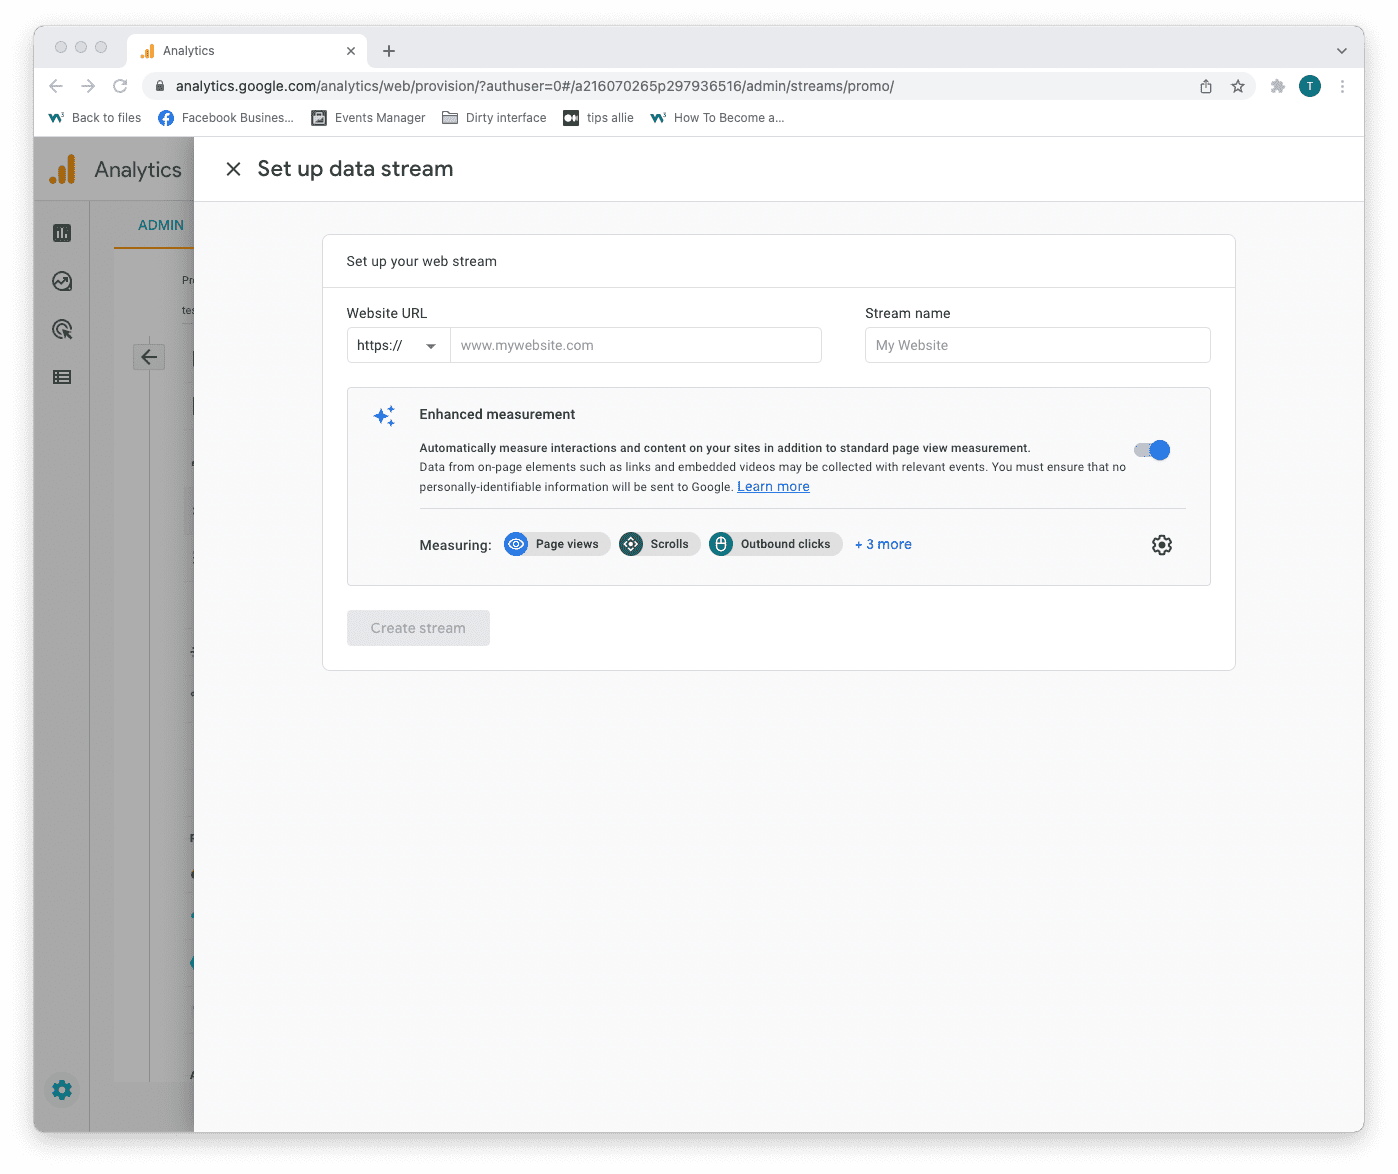
Step 9: Data stream setup
Enter data stream details.
- The URL to your site.
- The name that you want to give the stream.
- Decide if you are to enable enhanced measurement or not.
- Click on the "Create stream" button to continue.
The enhanced measurement can give the data more context. Improving your understanding of the traffic.
Step 10: Web stream overview
Here you can see a detailed overview of the web stream.
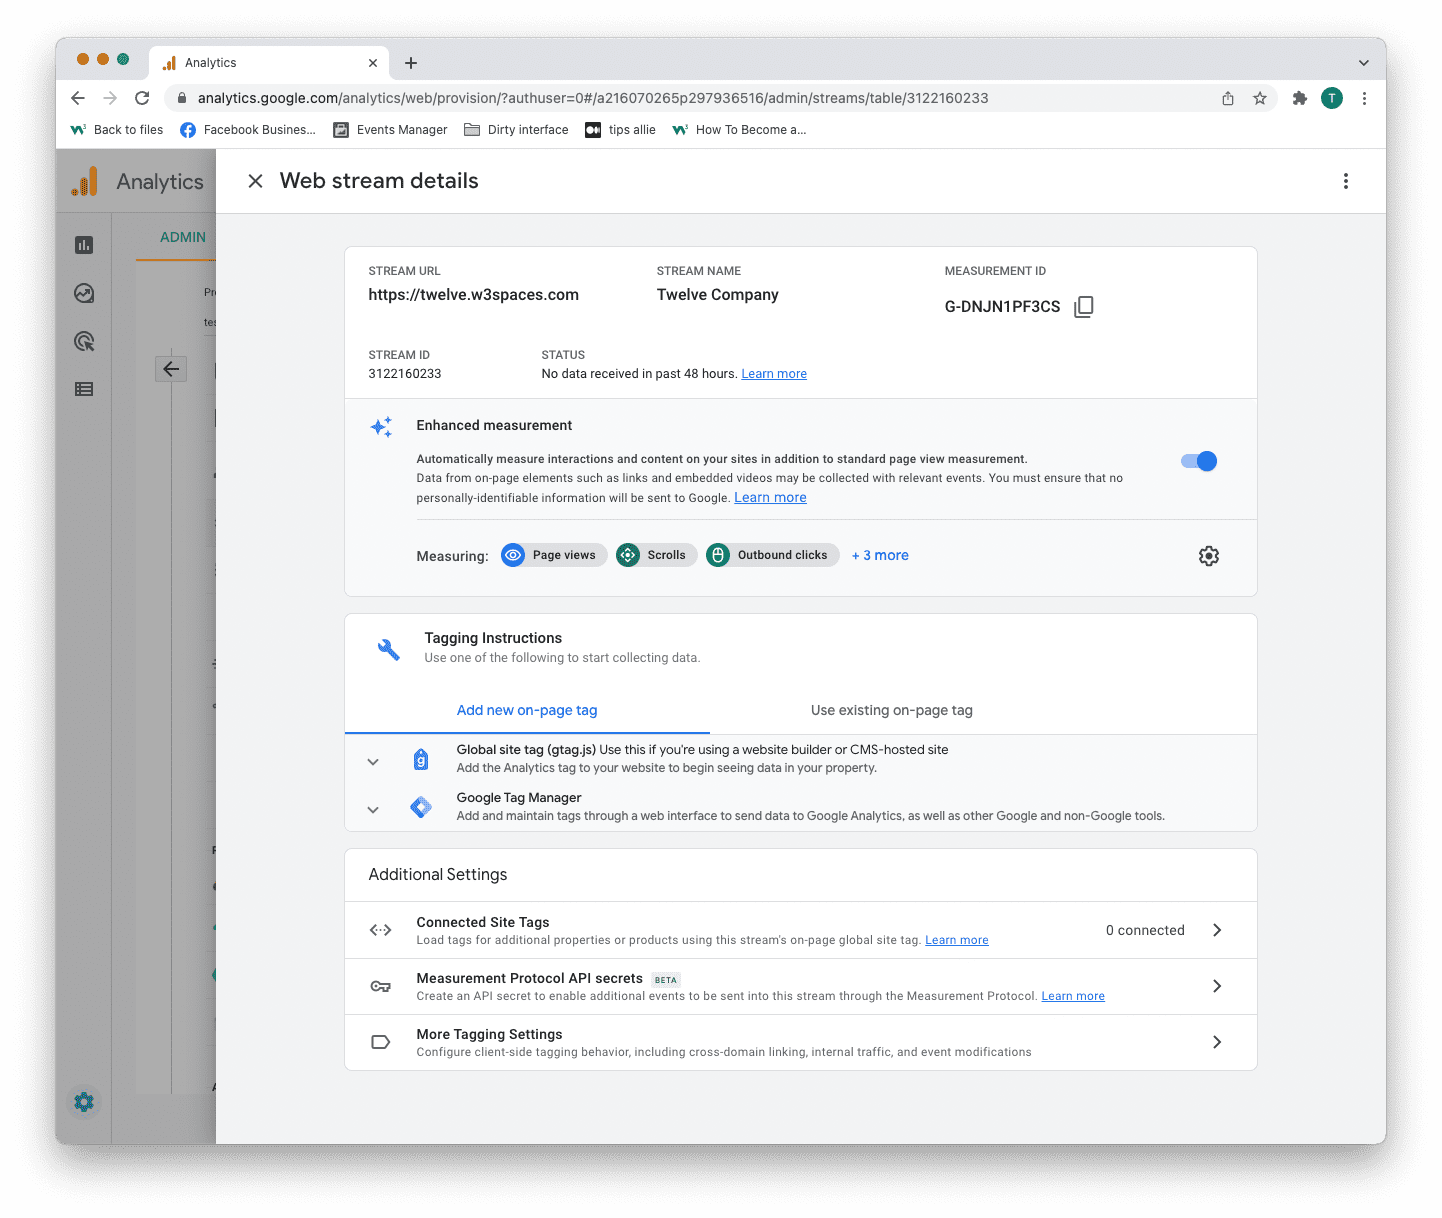
Here are the key takeaways from the overview.
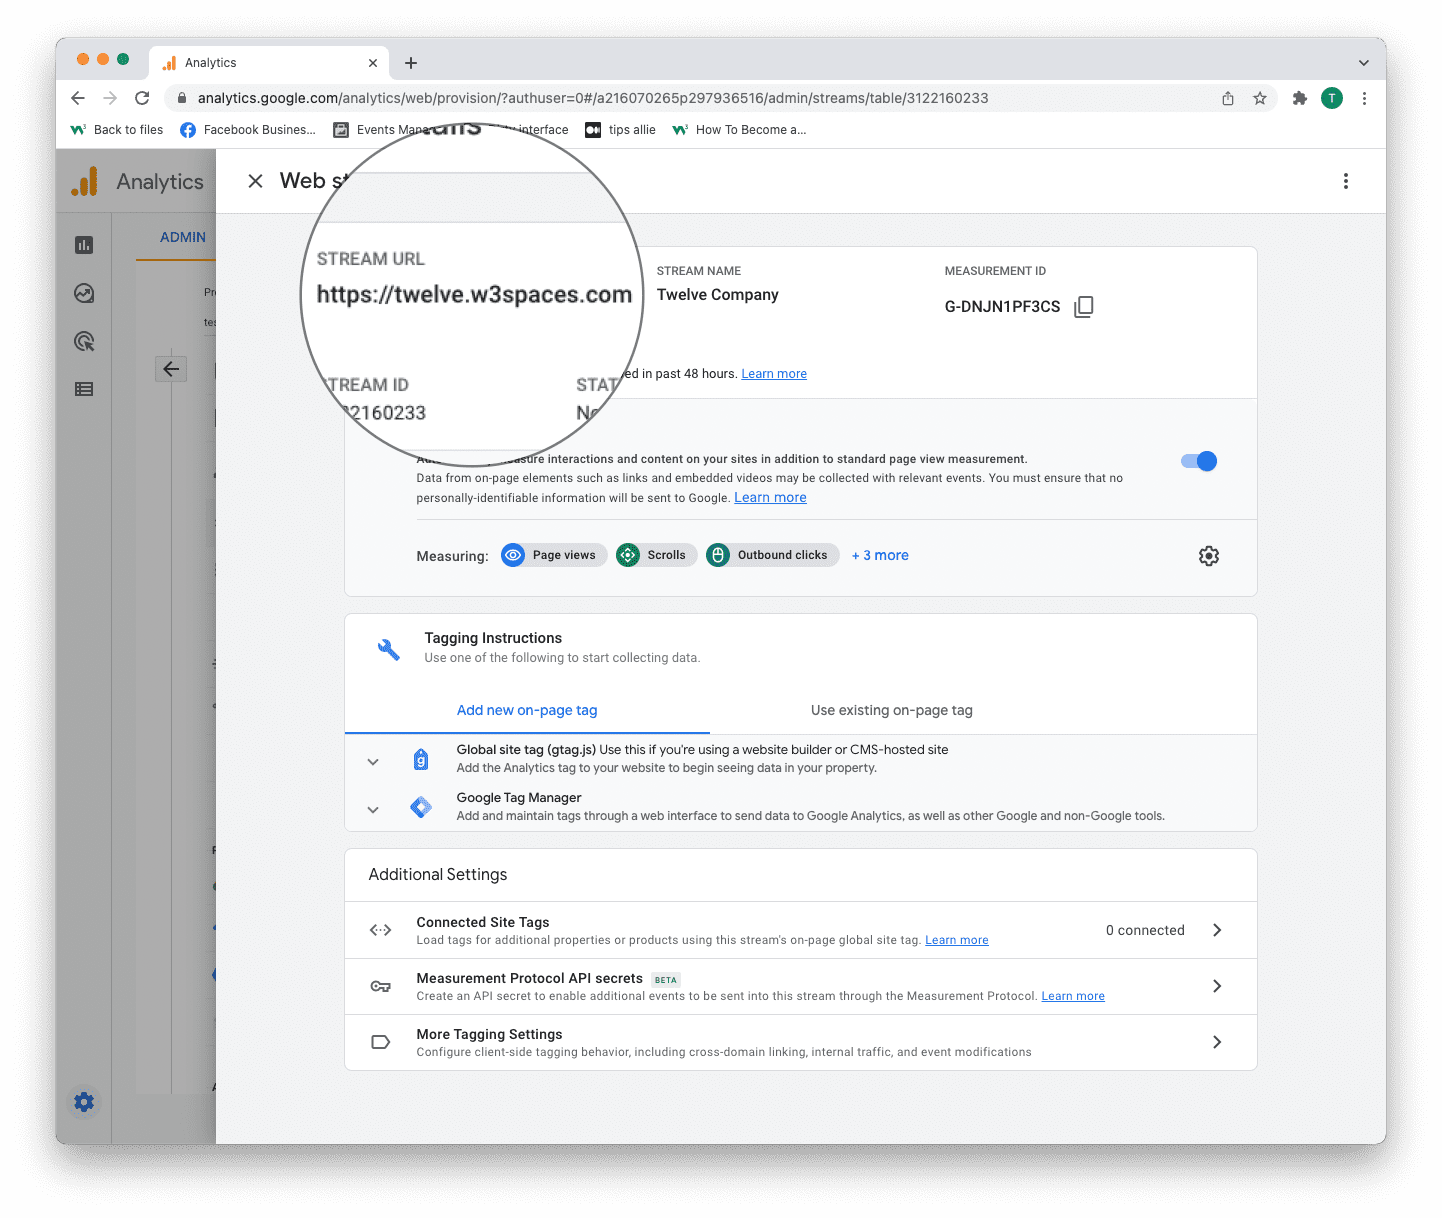
1. Stream URL.
The Stream URL is the link to the connected site.
2. Measurement ID
The Measurement ID is the identifier for your data stream.
It has a format of G-XXXXXXX.
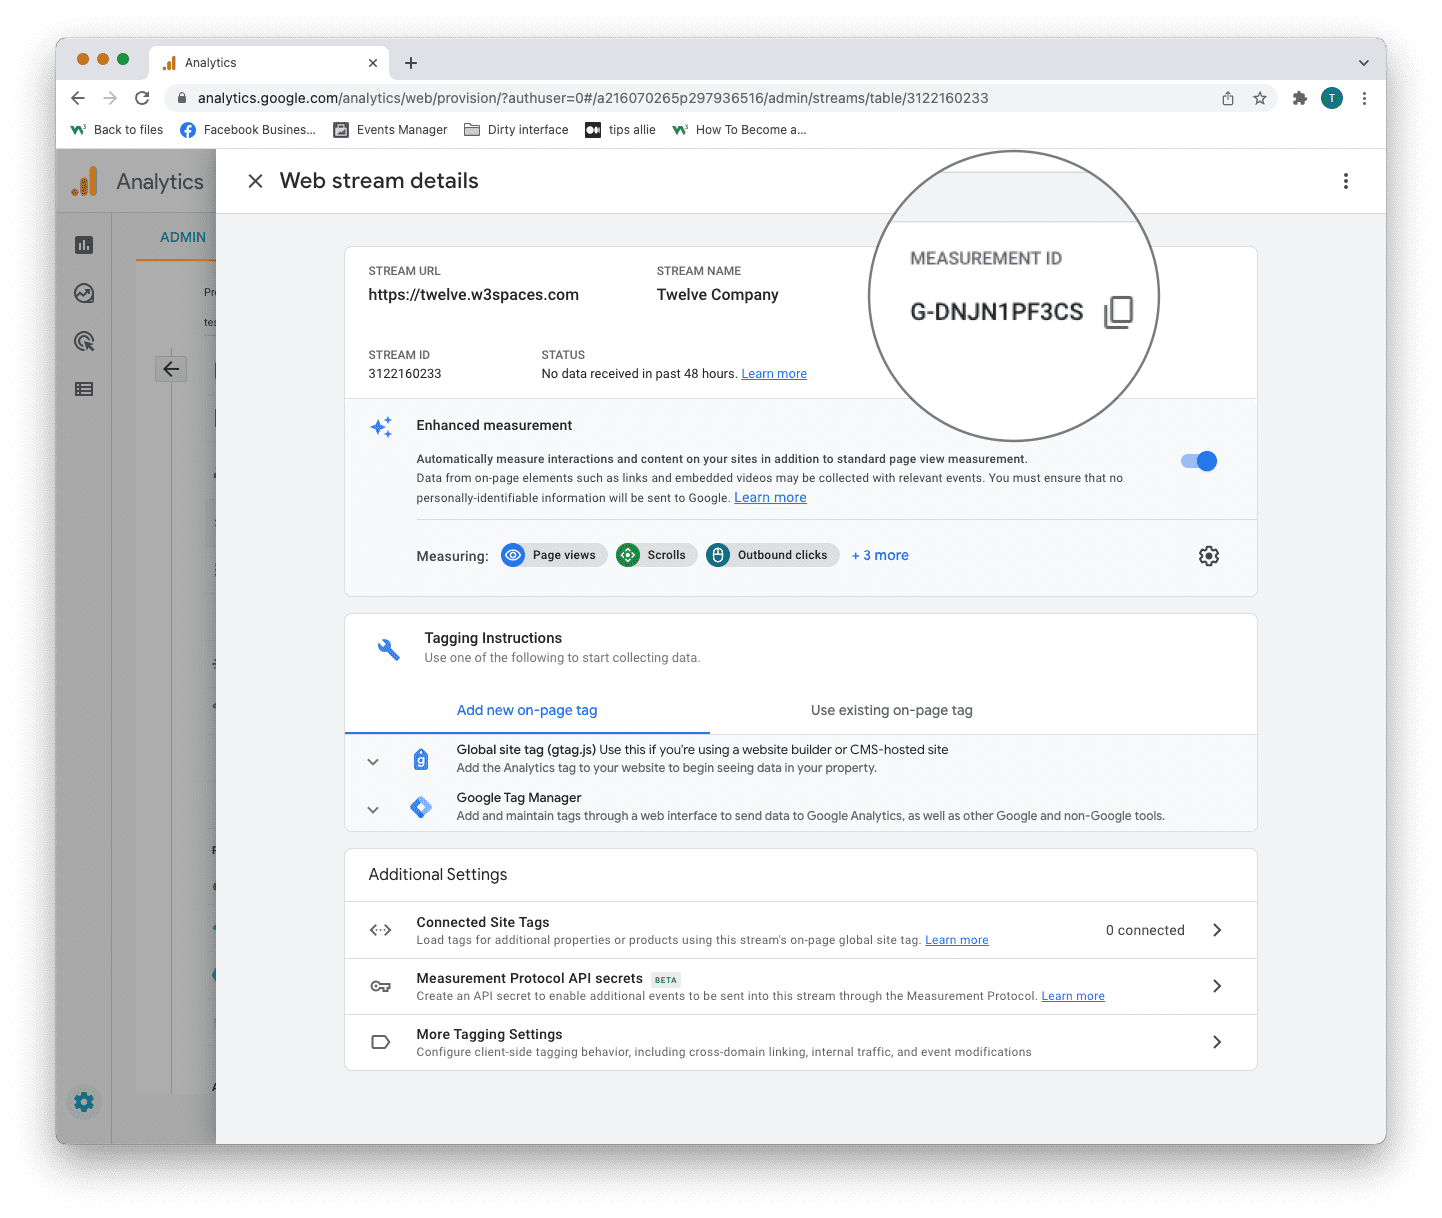
Google Analytics 4 uses Measurement ID. Older versions use Tracking ID. You can not have both.
3. Tagging instructions
Decide to use Global site tag (gtag.js) or Tag manager.
This tutorial will use the Global site tag.
Installing the Global site tag is the easiest and quickest way of getting it up and running.
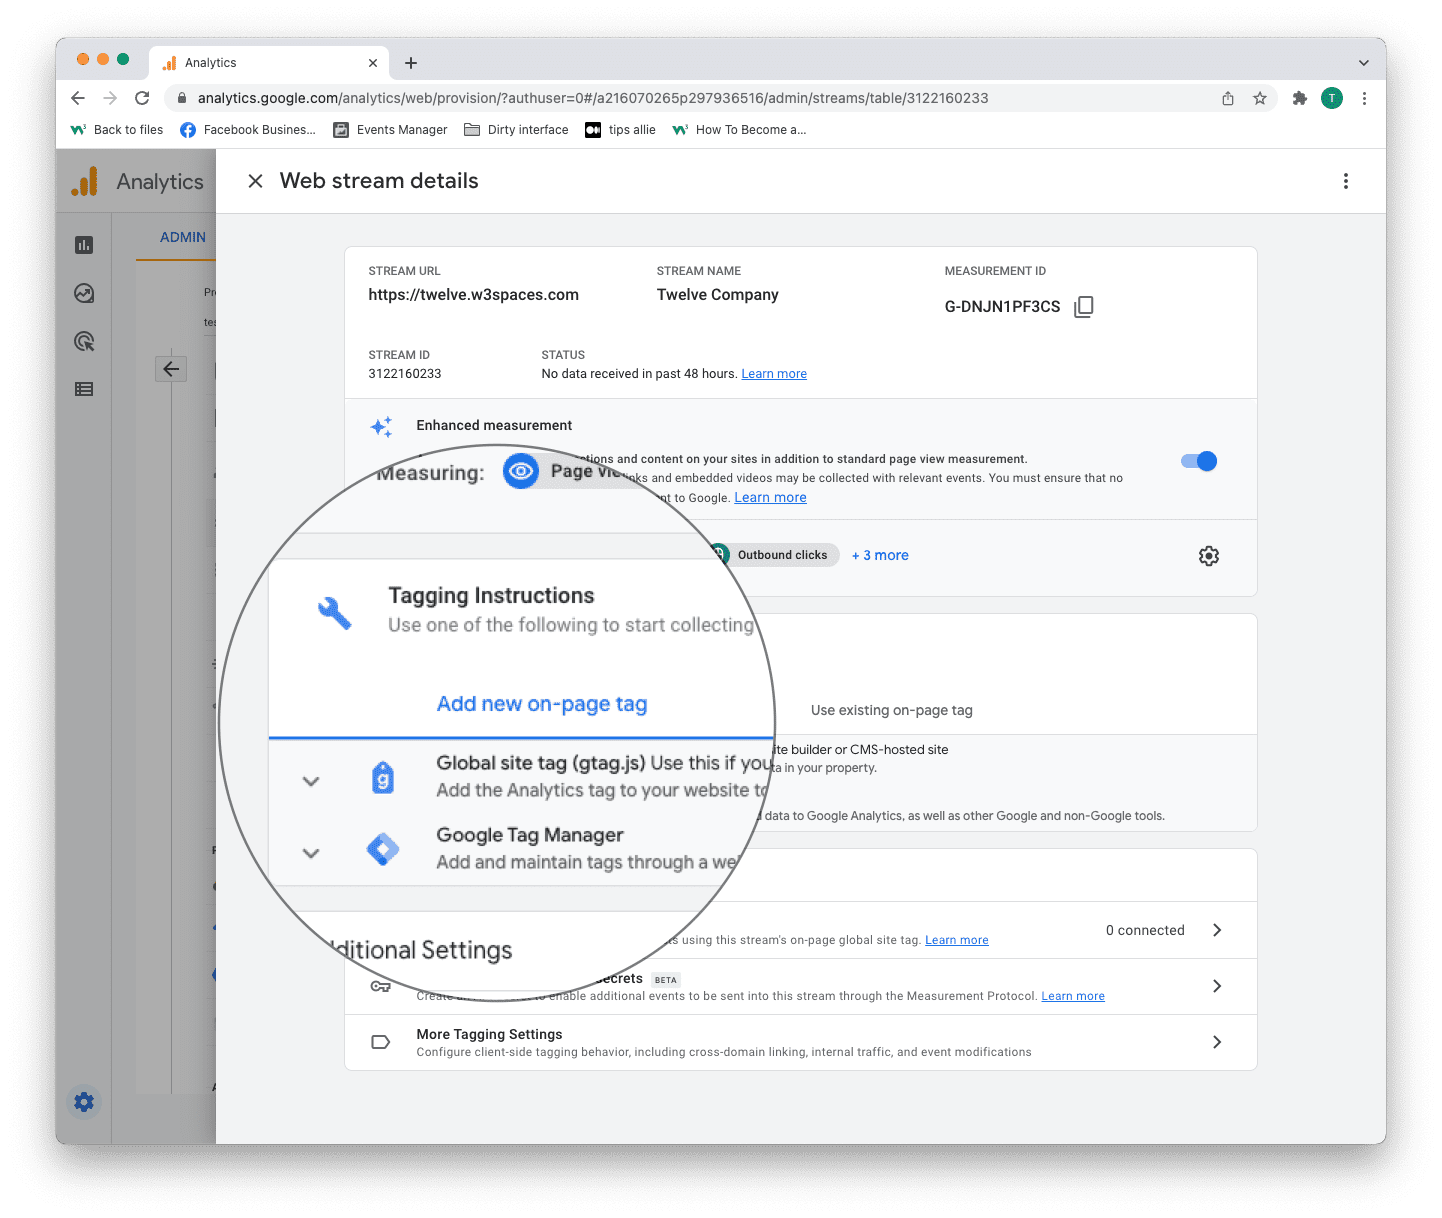
Step 11: Global site tag (gtag.js)
Click the "Global site tag (gtag.js)" row.
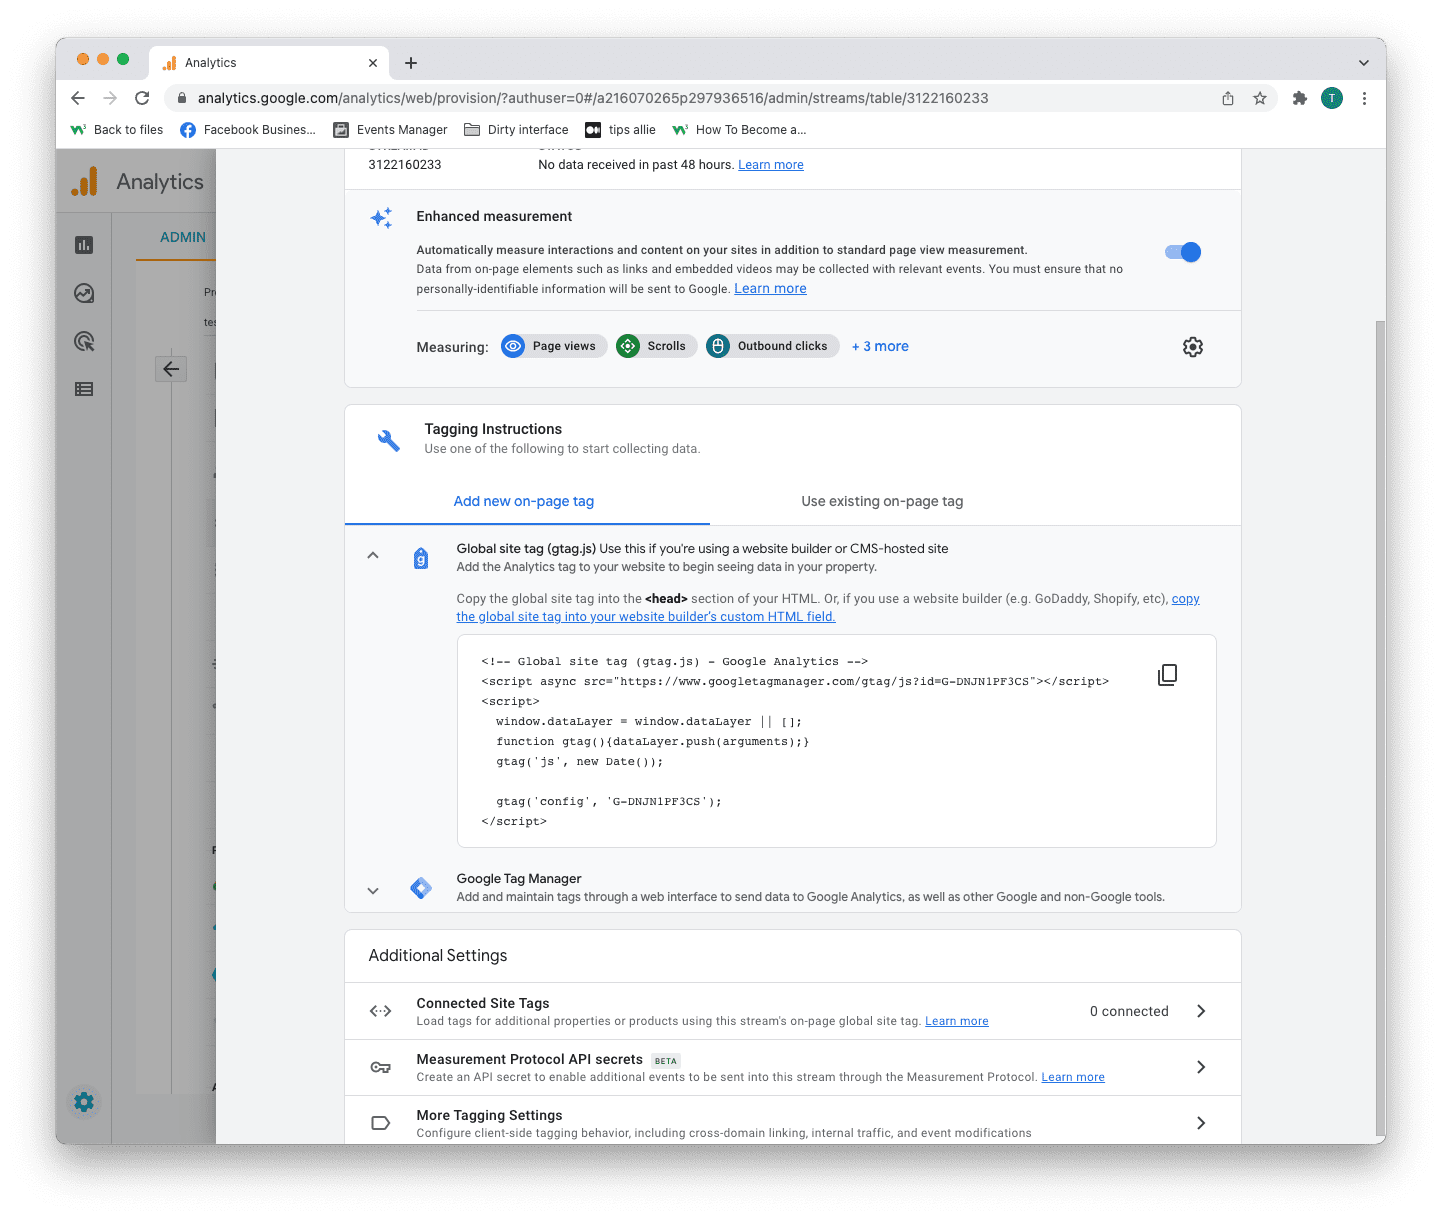
Here you can see a code snippet.
The code snippet is a script to allow Google to measure data on your site.
You can see the Measurement ID in the second last line in the code snippet.
The code snippet
<!-- Global site tag (gtag.js) - Google Analytics -->
<script async src="https://www.googletagmanager.com/gtag/js?id=G-DNJN1PF3CS"></script>
<script>
window.dataLayer = window.dataLayer || [];
function gtag(){dataLayer.push(arguments);}
gtag('js', new Date());
gtag('config', 'G-XXXXXXX');
</script>
Step 12: Enter the code snippet
Copy the code snippet.
Make sure to include your Measurement ID.
Locate the <head> tag in your HTML.
Paste the code snippet just below the <head> tag.
Save and publish the code.
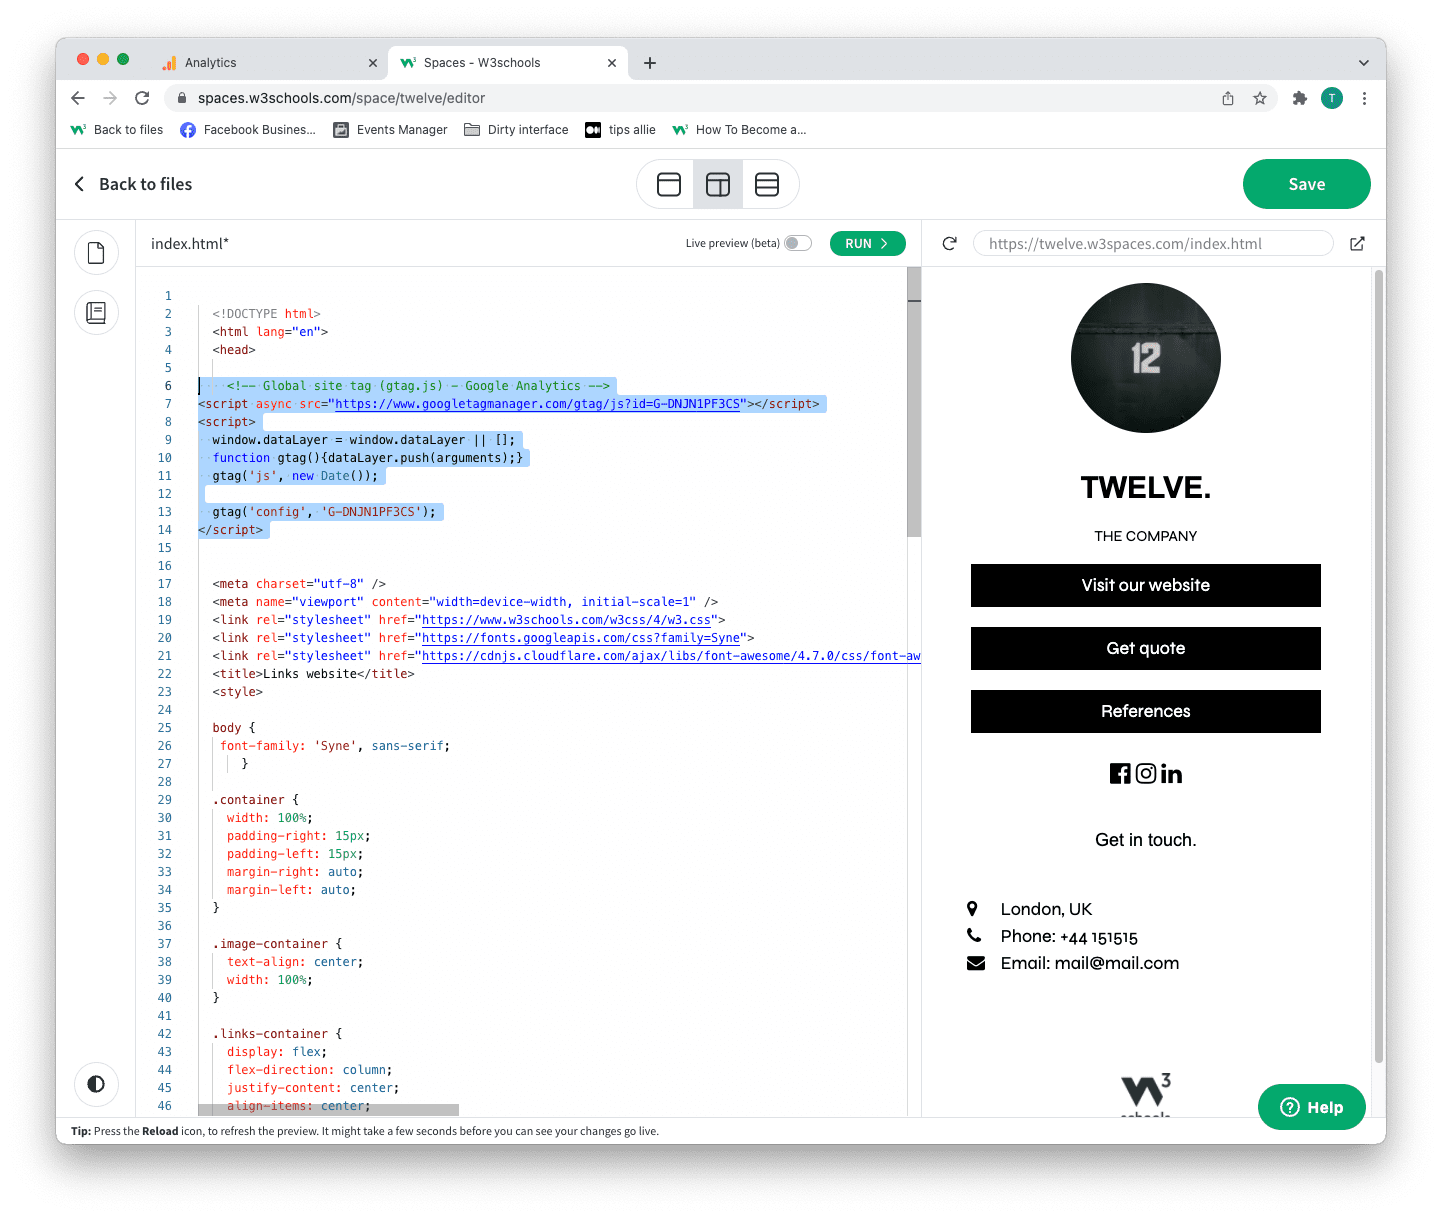
We used W3Schools Spaces in this example.
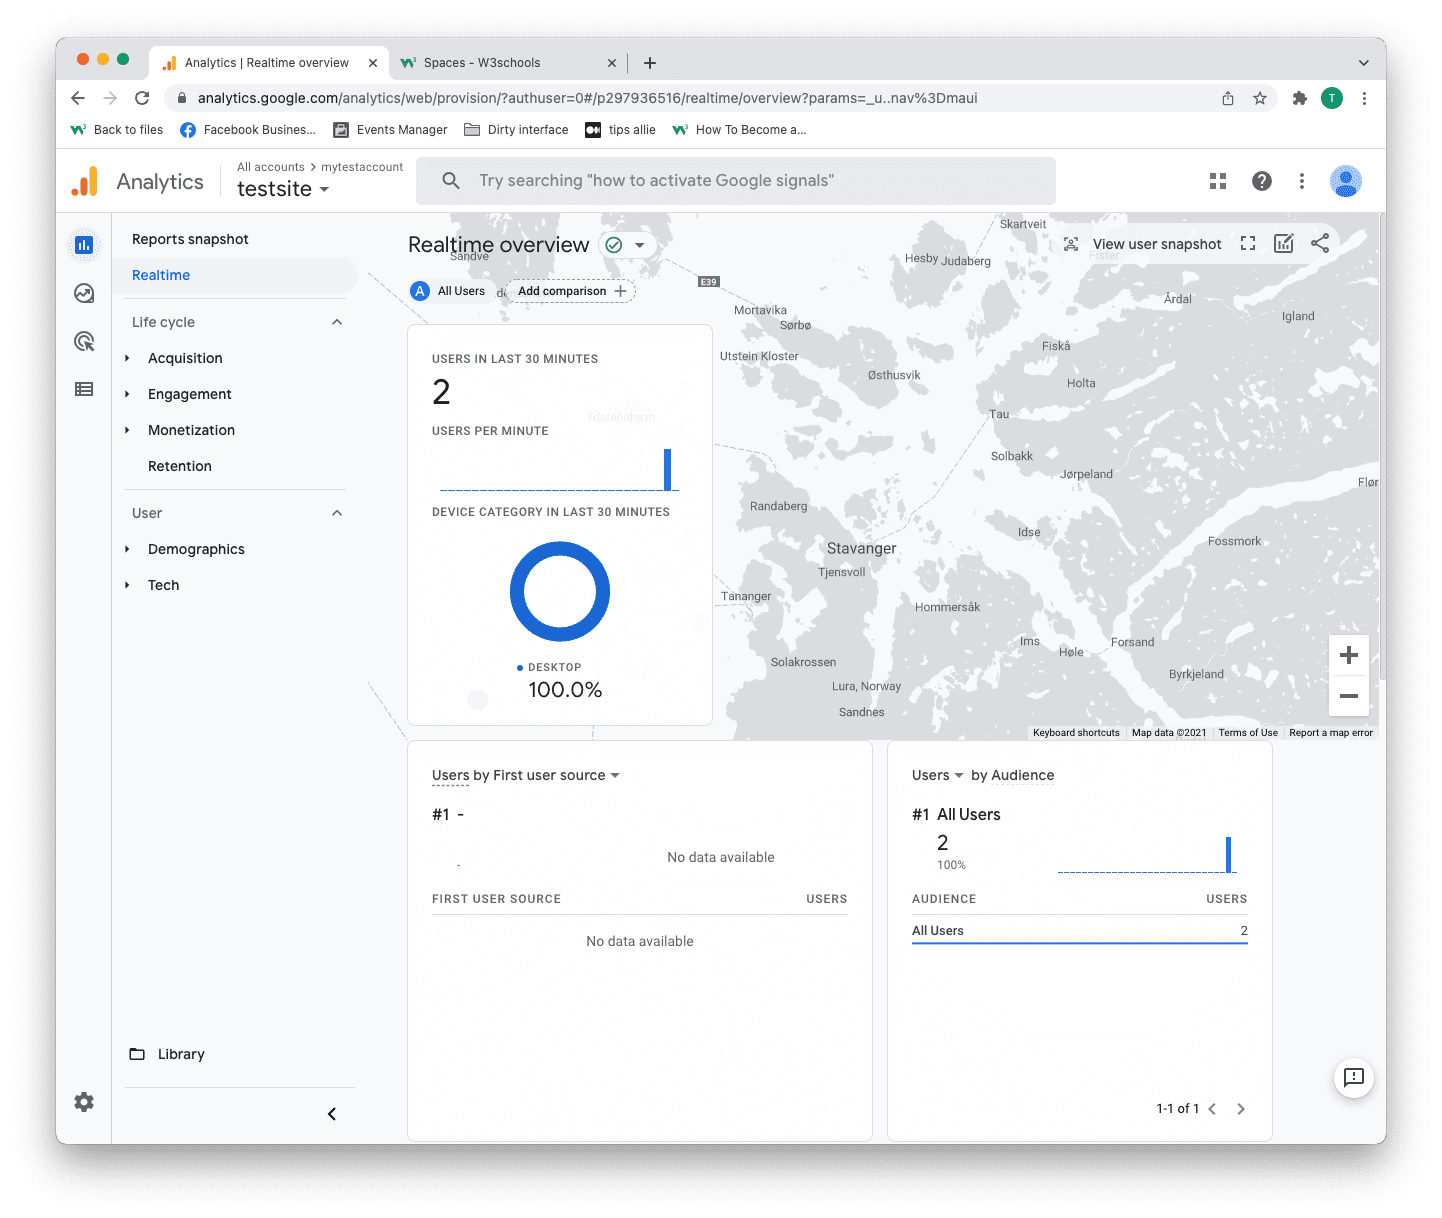
Step 13: Test that it works
Ensure that you have successfully saved and published the code snippet with the correct Measurement ID.
Open the URL for the site you have connected to the data stream.
Click on "Real time" on the menu to the left.
Confirm that you see yourself as an active user.
Congrats. You have successfully enabled Google Analytics for your site!
Explore Google Analytics
Recommended related topics are Tag manager and Events
Spend time in the service to learn about your user activity, commerce, demographics, device, and referrals.
Tip: Ever heard of W3Schools Spaces? It is a personal space where you can make a website from scratch or use a template and host it for free.
It has everything you need in the browser.
Get started in a few clicks.
Start now for free ❯* no credit card required